Showing posts with label cooking. Show all posts

Wednesday, July 6, 2011

Balsamic & Parmesan Roasted Cauliflower

...I'm trying to eat healthier, so I saw this recipe here, and decided to give it a try...
...and I don't know where my baking sheet it, so I cooked it in my beautiful star mold...
...the result?...nah...good but not as I expected it. Here is the recipe anyways:

Ingredients

  • 8 cups 1-inch-thick slices cauliflower florets, (about 1 large head; see Tip)
  • 2 tablespoons extra-virgin olive oil
  • 1 teaspoon dried marjoram
  • 1/4 teaspoon salt
  • Freshly ground pepper to taste
  • 2 tablespoons balsamic vinegar
  • 1/2 cup finely shredded Parmesan cheese
 Preparation
  1. Preheat oven to 450°F.
  2. Toss cauliflower, oil, marjoram, salt and pepper in a large bowl. Spread on a large rimmed baking sheet and roast until starting to soften and brown on the bottom, 15 to 20 minutes. Toss the cauliflower with vinegar and sprinkle with cheese. Return to the oven and roast until the cheese is melted and any moisture has evaporated, 5 to 10 minutes more.

Monday, June 27, 2011

S'more cookies...yesss....

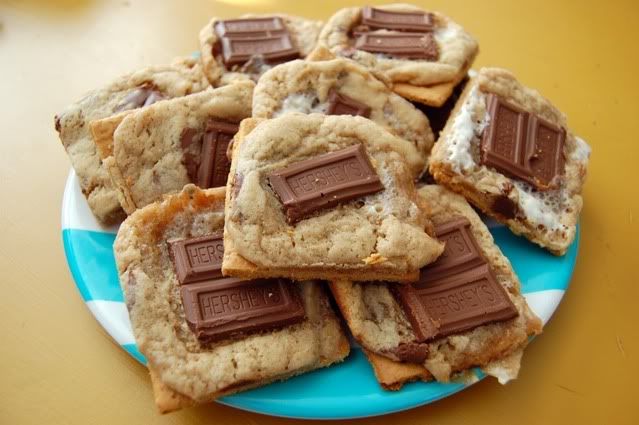
...We just went camping and had some (a lot) of extra stuff to make s'mores...I saw this recipe here, so I decided to give it a try...the result: AMAZING!
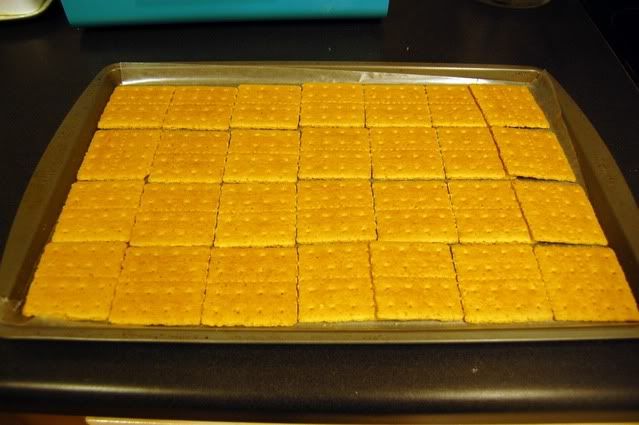
...Basically you just make a bed of graham crackers...
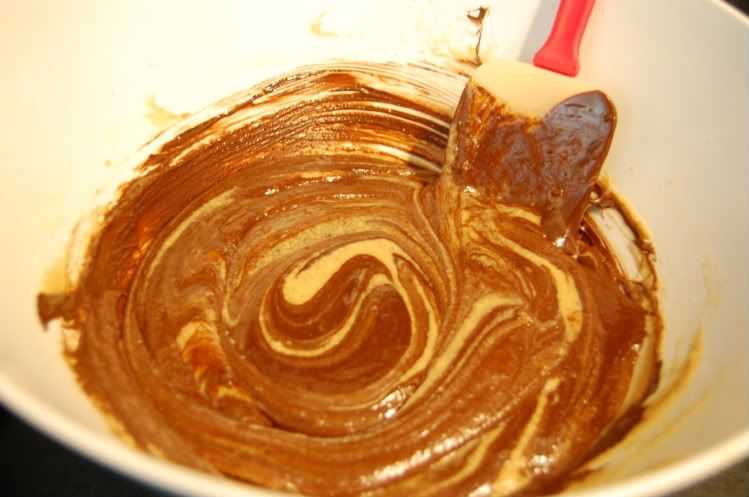
...prepare a special cookie dough with marshmallows and place it on top...
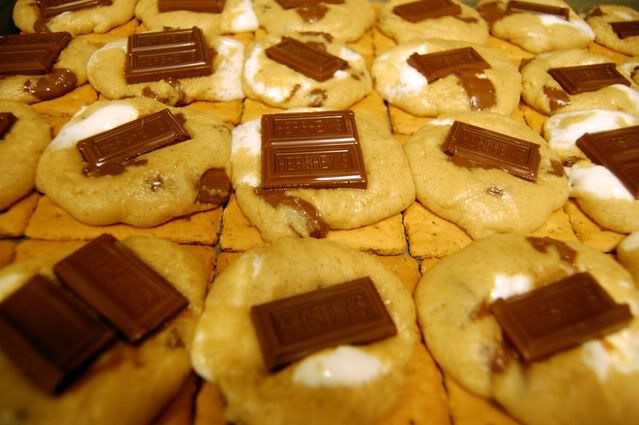
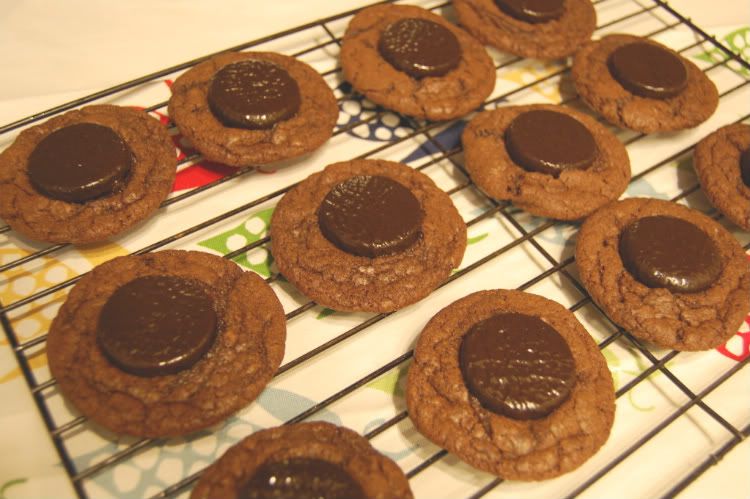
...cook it for 5 minutes, then put some Hershey's chocolate on top...
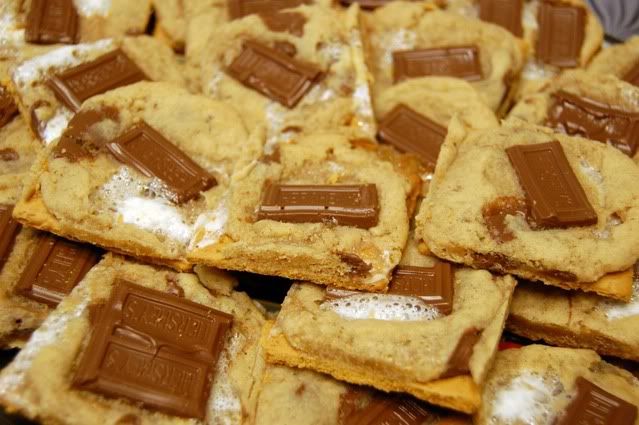
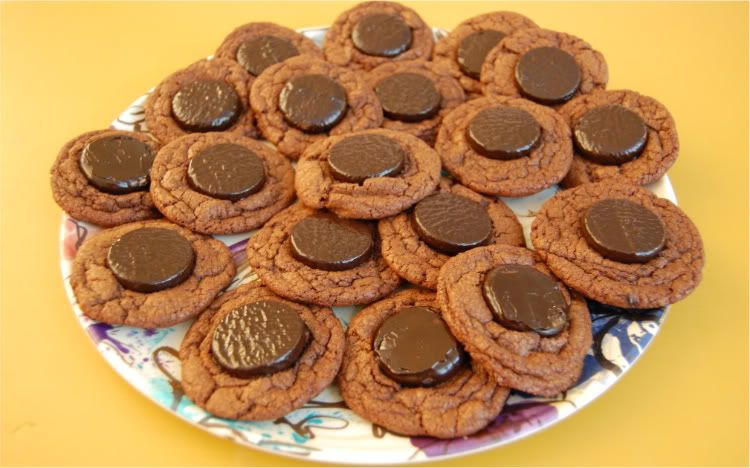
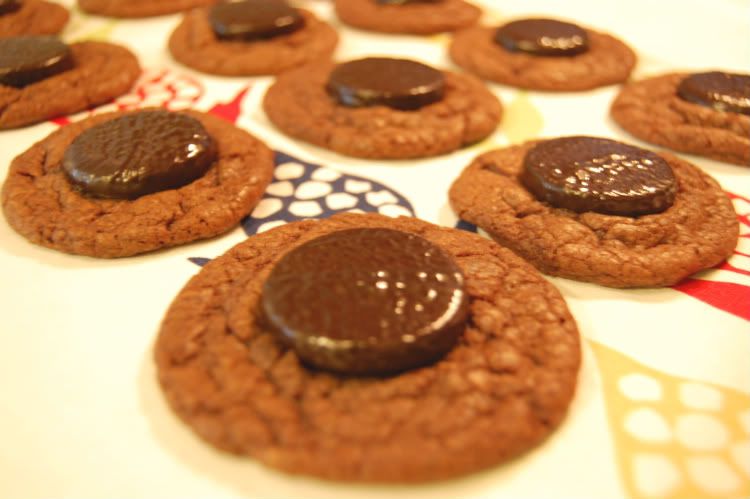
...and cook it for another 5 minutes!...so, so, so GOOD!...Here is the recipe: 

S'mores Cookies
Source: Ice Cream Before Dinner

11 Tablespoons unsalted butter, softened
1 cup brown sugar, packed
½ cup granulated sugar
2 large eggs
1 teaspoon vanilla
1 teaspoon baking soda
½ teaspoon sea salt
1 teaspoon cinnamon
2 ½ cups flour
1/2 cup semi-sweet chocolate chips
1 cup mini marshmallows
3 regular sized Hershey’s bars, broken into pieces
1-2 packages graham crackers, broken into squares

Directions:
Preheat the oven to 375 degrees. Line baking pans with parchment paper. I used one 11x17 pan and one 9x13 pan but you can really use any sized pans you want.

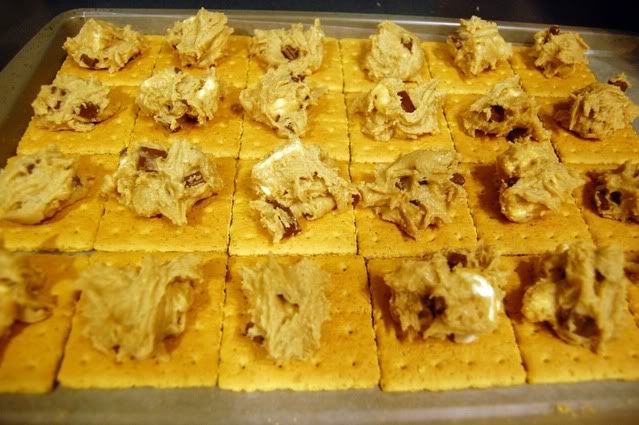
Lay out graham crackers side by side on the pans as close as possible (they should be touching). I used 16 graham cracker squares on one pan and 10 squares on another. You may have to add or remove graham crackers according to how much dough you have. If you want your cookies thicker you will use more dough and less graham crackers.
In a medium bowl, whisk together the flour, baking soda, sea salt and cinnamon to combine. Set aside.

In the bowl of an electric mixer, cream butter with white and brown sugar until light and fluffy. Add the eggs and vanilla and mix until combined.

Add the flour mixture to the butter mixer and combine on low speed.

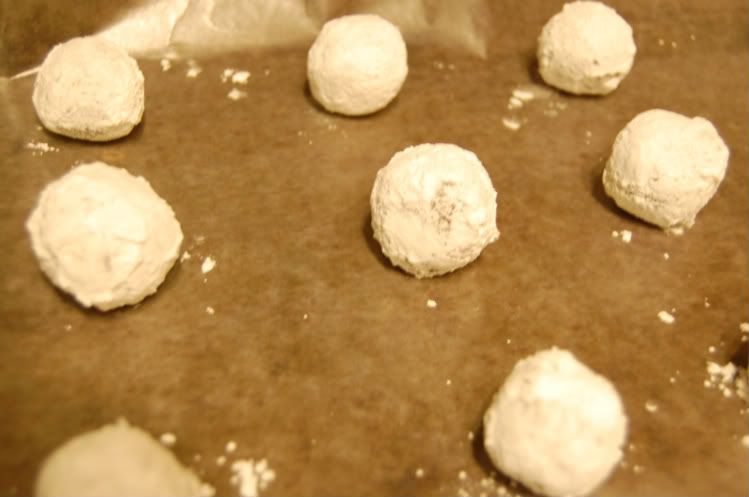
Fold in the chocolate chips and marshmallows. Chill dough in refrigerator for 1 hour to overnight

Place tablespoons of dough on graham crackers about 1 – 1 ½ inches apart. I averaged about 1 1/2 tablespoons of dough per graham cracker square as seen in the picture above. Press down slightly with fingertips.

Bake for 5 minutes then remove from oven to press Hershey’s bar pieces on to the top. You can place as many pieces or as little as you want depending how much chocolate flavor you want.

Bake for 5 – 7 more minutes or until dough is beginning to turn golden brown at the edges. Remove to a wire rack to cool. For clean cutting make sure cookies are completely cool and cut with a sharp knife.

Sunday, May 15, 2011

today I made these...


...and they turned out pretty good...perfect treat!
 Recipe:
1 cup creamy peanut butter
2 tablespoons softened butter
1/2 cup powdered sugar
3/4 cup brown sugar
Pretzels
1 bag semi-sweet chocolate chips
Directions:
1. Line a baking sheet with wax paper and set aside.
2. In the bowl of a stand mixer fitted with the paddle attachment, beat peanut butter and butter until combined. Scrape down bowl, add sugars and beat until combined. You should be able to roll the mixture into balls without sticking to your hands. If needed, add more powdered sugar until you reach a consistency that is easy to roll.
3. Roll the mixture into small balls, about 1 teaspoon of mixture for each ball, and place on prepared baking sheet. Sandwich the balls between two pretzels and place in the freezer for 30 minutes.

Sunday, April 17, 2011

Arroz con leche yum!

...This weekend I cooked "arroz con leche" a typical dessert from Spain (not to be confused with rice pudding... please...this is more rich, more tasty....a lot better!)
...My grandma Isabel taught me how to make it before my mission. It is a family recipe and  the smell of it brings so many memories...so making it made super homesick!
..I cooked it a lot during my  mission: for investigators, church parties, other missionaries... so a lot of people asked me for the recipe, so I made copies of the instructions and a picture of my cute grandma . At the end of my mission this dessert was famous all over the place!..
...sorry...it is in Spanish...if you are very interested I might translate it just for you;)

Sunday, April 3, 2011

Conference weekend is...awesome.

...and I will tell you why: because I get to spend a great amount of time listening to my church leaders and enjoying a much needed family time. Today, as I type this at 1:26 p.m., I'm still in my pj's while eating that very "planned" soup while is snowing outside and we wait to hear the next session. Perfect. Just perfect. But the best part isn't being at home with my loves while eating comforting food...the best part is listening to our Prophet speak and getting my soul  fed as well. Can this day last forever?..please and thank you.

Saturday, January 22, 2011

Chocolate Crackles...(thanks to Martha)


...after seeing these cookies here and here, I decided to give them a try...

...they were pretty easy to make...

...and they look so pretty!...

...so yep, definitely a good recipe to keep and try again soon...

Ingredients

Makes about 4 dozen

  • 8 ounces bittersweet chocolate, melted and cooled
  • 1 1/4 cups all-purpose flour
  • 1/2 cup Dutch cocoa powder
  • 2 teaspoons baking powder
  • 1/4 teaspoon salt
  • 8 tablespoons (1 stick) unsalted butter, room temperature
  • 1 1/3 cups light-brown sugar, firmly packed
  • 2 large eggs
  • 1 teaspoon pure vanilla extract
  • 1/3 cup milk
  • 1 cup confectioners' sugar, plus more for rolling

Directions

  1. Heat oven to 350 degrees. Chop bittersweet chocolate into small bits, and melt over medium heat in a heat-proof bowl or the top of a double boiler set over a pan of simmering water. Set aside to cool. Sift together flour, cocoa, baking powder, and salt.
  2. In the bowl of a heavy-duty electric mixer fitted with the paddle attachment, beat butter and light-brown sugar until light and fluffy. Add eggs and vanilla, and beat until well combined. Add melted chocolate. With mixer on low speed, alternate adding dry ingredients and milk until just combined. Divide the dough into quarters, wrap with plastic wrap, and chill in the refrigerator until firm, about 2 hours.
  3. On a clean countertop, roll each portion of dough into a log approximately 16 inches long and 1 inch in diameter, using confectioners’ sugar to prevent sticking. Wrap logs in plastic wrap, and transfer to a baking sheet. Chill for 30 minutes. Cut each log into 1-inch pieces, and toss in confectioners’ sugar, a few at a time. Using your hands, roll the pieces into a ball shape. If any of the cocoa-colored dough is visible, roll dough in confectioners’ sugar again to coat completely. Place the cookies 2 inches apart on a Silpat-lined baking sheet. Bake until cookies have flattened and the sugar splits, 12 to15 minutes.
  4. Transfer from oven to a wire rack to let cool completely. Store in an airtight container for up to 1 week.
From Martha Stewart Living, February 2003

Monday, September 20, 2010

Chocolate Mint Cookies

Let me start by telling you that I have never been a fan of mixing chocolate with mint...there is something about those two together, that I've never liked, until I baked these....they are good. Very good.

Here is the recipe:

Ingredients
3/4 cup butter
1 1/2 cups packed brown sugar
2 tablespoons water
2 cups semisweet chocolate chips
2 eggs
2 1/2 cups all-purpose flour
1 1/4 teaspoons baking soda
1/2 teaspoon salt
36 chocolate mint wafer candies
Directions
In a large pan over low heat, cook butter, sugar and water until butter is melted. Add chocolate chips and stir until partially melted. Remove from heat and continue to stir until chocolate is completely melted. Pour into a large bowl and let stand 10 minutes to cool off slightly.
At high speed, beat in eggs, one at a time into chocolate mixture. Reduce speed to low and add dry ingredients, beating until blended. Chill dough about 1 hour.
Preheat oven to 350 degrees F (175 degrees C).
Roll dough into balls and place on ungreased cookie sheet about 2 inches apart. Bake 8-10 minutes. While cookies are baking unwrap mints and divide each in half. When cookies are brought out of the oven, put 1/2 mint on top of each cookie. Let the mint sit for up to 5 minutes until melted, then spread the mint on top of the cookie. Eat and enjoy!
Note: I never did the last part...the whole spreading the mint think...I just think it looks prettier with the whole mint on top.

...and of course, Mr. D had so much fun with one of these...he even thought that it would look great on his hair.

Friday, September 17, 2010

Peach cobbler, anyone?

...of course Diego is always ready for some sweet stuff....so yesterday my cute neighbor Liz gave us a box full of peaches!...so I decided I had to try making a peach cobbler..I've always wanted to make one... below, some pictures of the very easy proccess...


....it is not the prettiest thing I have ever made, but let me tell you, it tasted pretty good...This is the recipe I used.

Sunday, August 8, 2010

Let the party planning begin!

Yes my friends, Mr. D. turns one in a little bit more than 2 months, and I want to make it very special....it's his first birthday! and maybe I want to celebrate too that he is alive!, that I didn't do it so bad as I thought I was doing during his first weeks of life and that he's a healthy and strong boy!
So I got one of this cake molds to make a BIG cupcake...


I think they are so cute...that will be the cake Mr. D will destroy all by himself. For the rest of the party I will have another cake, I haven't decide it yet.

...so I will probably practice this week...I will make one to see how it turns out. I'm still looking for a theme or idea for the party...any ideas? (just so you know I'm not very into the Disney or Cartoon characters thing...)
So yeah...I'm as excited as when I was planning my amazing circus baby shower with my sister Ama...

Monday, July 26, 2010

Super duper good peanut butter cookies


These were amazing. I got the recipe from the America's Test Kitchen book...It makes a lot, so I baked a few and I froze the rest of the cookie dough to use later.
...someone was very excited to get his little hands on one of these...he did, he grabbed it, and threw it on the floor...I don't think he digs peanut butter...

Here is the recipe:

2 ½ c. flour
½ tsp. baking soda
½ tsp. baking powder
½ tsp. salt
½ lb. (2 sticks) SALTED butter, softened but still firm
1 c. packed brown sugar
1 c. granulated sugar
1 c. extra-crunchy peanut butter
2 large eggs
2 tsp. vanilla
1 c. roasted salted peanuts, ground in food processor to resemble bread crumbs, about 14 pulses

Adjust oven rack to low-center position. Heat oven to 350°. Line large cookie sheet with parchment paper.

Whisk flour, baking soda, baking powder and salt together in medium bowl, set aside.

Either by hand or with electric mixer, beat butter until creamy. Add sugars; beat until fluffy, about 3 minutes with electric mixer, stopping to scrape down bowl as necessary. Beat in peanut butter until fully incorporated, then eggs, one at a time, then vanilla. Gently stir dry ingredients into peanut butter mixture. Add ground peanuts, stir gently until just incorporated.

Working with generous 2 tablespoons each time, roll dough into 2 inch balls. Place balls on parchment-lined cookie sheet, leaving 2 ½ inches between each ball. Press each dough ball twice with dinner fork dipped in cold water to make crisscross design. Bake until cookies are puffed and slightly brown along the edges (but not on top--they will look slightly under baked) about 10-12 minutes.

Saturday, July 24, 2010

Psssssssss....PISTO!

...Today I was in the mood of some yummy Spanish food...so I decided to cook some Pisto. It never disappoints. And it's pretty healthy too. Here is a good recipe:

Pisto Manchego with Eggs

2 tablespoons olive oil
1 medium onion, chopped
4 garlic cloves, minced
2 pounds zucchini, or a combination of green and yellow summer squash, diced
2 pounds tomatoes, peeled, seeded and chopped (juice reserved)
Salt & Pepper
4-6 eggs

Heat the oil in a large, heavy, nonstick skillet over medium heat, then add the onion. Stir often, until transluscent — about 5 minutes. Add the garlic and cook, stirring, for another minute or two until fragrant. Stir in the squash and 1/2 teaspoon salt, and cook for 5 minutes, until the squash is coated with oil and beginning to soften. Add the tomatoes, and salt to taste (3/4 to 1 teaspoon), and turn the heat to medium-high. Stir often for 5 to 10 minutes, until the tomatoes have slightly cooked down. Add the juice from the tomatoes plus 1/4 cup water, stir together, and turn the heat back down to medium-low. Cook uncovered for 30 to 35 minutes, until the vegetables are soft and easy to mash. Stir often until the mixture cooks down and begins to stick to the pan. From time to time, press on the squash with the back of your spoon so that it breaks down. Taste, adjust the salt, and add lots of pepper.

Using the back of your spoon, make 4-6 wells in the vegetable mixture and break an egg into each well. Sprinkle with salt and pepper. Cover the pan, and cook until the eggs have set, about six to eight minutes (the whites should be set, but the yolks should still be runny). Serve, using a spatula to dish out portions of pisto topped with an egg, or two.

Monday, June 28, 2010

{blueberry muffins and cute cupcake wrappers}


I've noticed lately that when I'm worried or nervous, I bake...So yesterday I had to try to make this recipe....they were very, very good....


...and then I decided that they look pretty plane...I saw these amazing wrappers the other day, and then I found this stencil to make my own, so I decided to give it a try...


...I made this one with a pretty punch that I have, the rest, with the stencil...


...they are so easy to make!.. I used scrapbook paper and plane tape...love them!!!let me know if you have any questions!..any!:)

Wednesday, June 23, 2010

Another bad but really good recipe...


...these beauties are Reese's cookies...

..so so so good inside... those who know me know that I have 3 loves: Mike, Mr. D and peanut butter...

...so yesterday after seeing the recipe, I had to try them...and let me tell you...they didn't disappointed...

...right fresh from the oven...

...my loves...

..and then I packaged them for my visits and neighbors...

I'm happy/sad to report, that I was strong enough to only have one.

Here is the recipe


Ingredients

  • 1 3/4 cups all-purpose flour
  • 1/2 teaspoon salt
  • 1 teaspoon baking soda
  • 1/2 cup butter, softened
  • 1/2 cup white sugar
  • 1/2 cup peanut butter
  • 1/2 cup packed brown sugar
  • 1 egg, beaten
  • 1 teaspoon vanilla extract
  • 2 tablespoons milk
  • 40 miniature chocolate covered peanut butter cups, unwrapped

Directions

  1. Preheat oven to 375 degrees F (190 degrees C).
  2. Sift together the flour, salt and baking soda; set aside.
  3. Cream together the butter, sugar, peanut butter and brown sugar until fluffy. Beat in the egg, vanilla and milk. Add the flour mixture; mix well.
  4. Shape into 40 balls and place each into an ungreased mini muffin pan.
  5. Bake at 375 degrees for about 8 minutes. Remove from oven and immediately press a mini peanut butter cup into each ball. Cool and carefully remove from pan.

Recipe from allrecipes.com